Jumat, 21 Agustus 2015

Gateway Central XV HO Scale Switching Model Railroad

Gateway Central XV HO Scale Switching Model Railroad


layout design, text and photos by Richard Schumacher
Our 15th project railroad has a number of differences from our previous model railroad layouts. The other project railroads were given away each year, we plan to keep this one (at least for a few years). The other project railroads had a loop in the plan so the trains could go round and round, this one is purely a switching layout and doesn’t have a continuous running option. And this one was designed to be really small, so it will sit on a table at train shows and easily move in the back seat of any car.
Gateway Central XV HO Scale Switching Model Railroad

Design Parameters

Purpose – a small switching layout for display and operation at Train Shows and other events.
  • Must fit on a standard Train Show table with room for a tabletop display and literature/handouts.
  • Light weight and easily transportable, even by one person.
  • Sized to fit in the back seat of a normal automobile.
  • Little or no assembly/setup required on site.
  • Fairly easy to build.
  • HO standard gauge using commercial track pieces.
  • One runaround track with facing and trailing point sidings.
  • Ability to expand or connect to another layout.
  • Switching contest capability, but still moderately easy to switch.
  • For a small switch engine and 40′ boxcars.
  • Interesting online structures.
  • Able to work with either conventional DC or DCC power.

Overhead View of the Gateway Central XV HO Scale Switching Model Railroad

Switching Layout Design and Construction

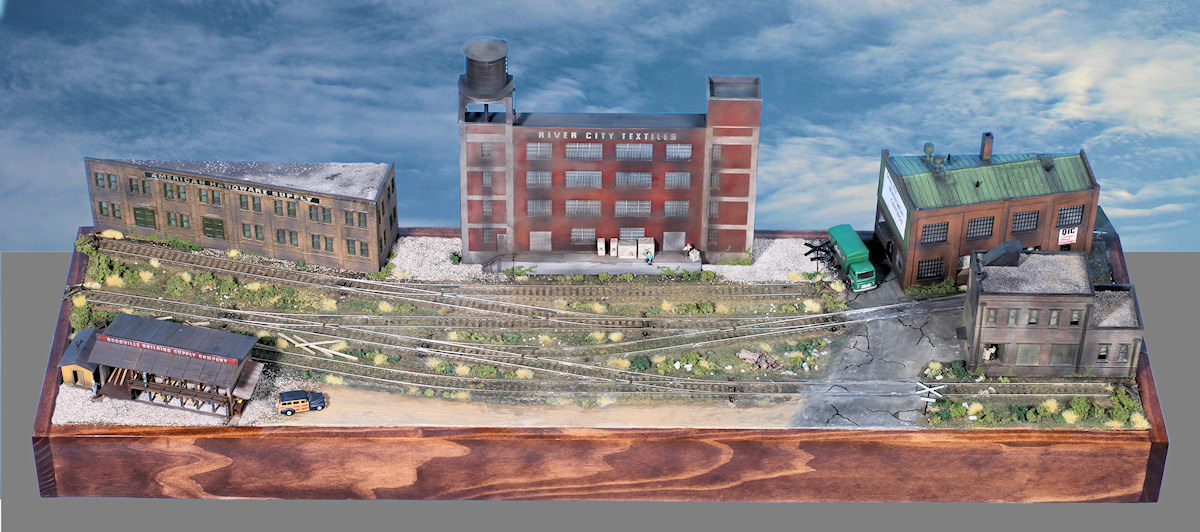
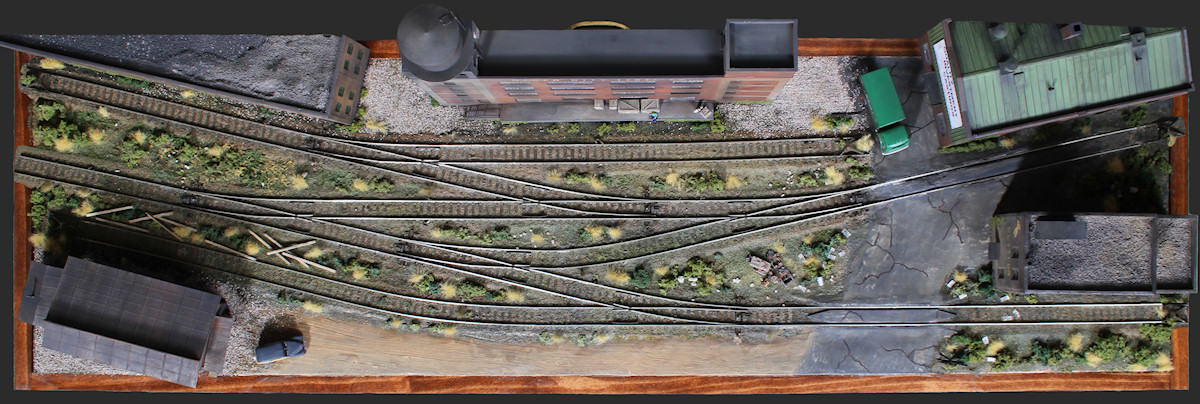
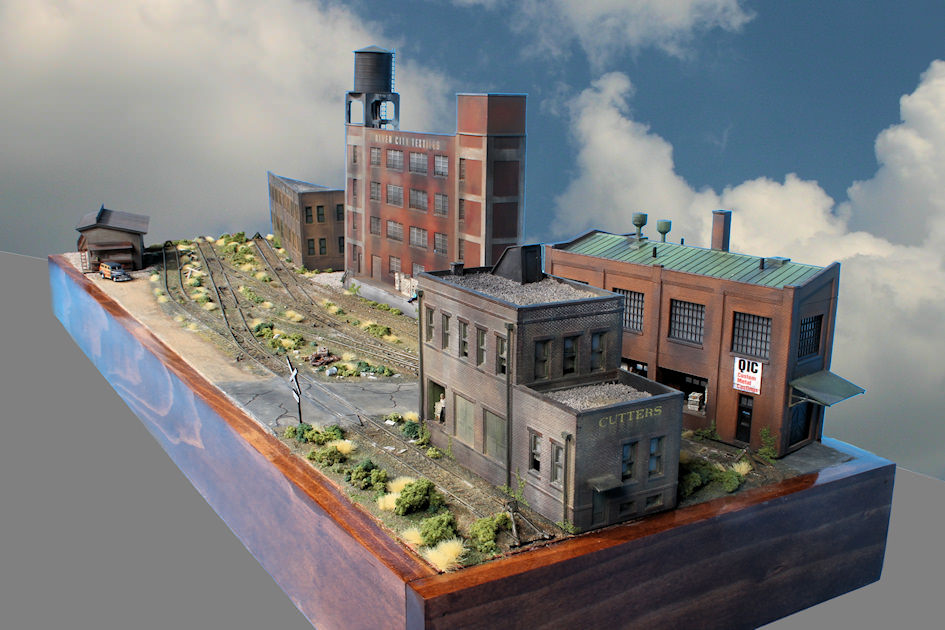
I worked though four possible designs. Most were too wide for the “fit in the back seat” goal. Some were too complex to switch for the average person walking up at a Train Show (the idea, after all, is to have fun with the layout). The final design features five industrial structures, six car setout spots, and six #4 turnouts – and with some construction, operation and parts selection tricks made it in at just shy of four feet in length. Our Train Show version weighs just over 13 pounds and has a handle on back to carry it around. If you want to build a version of this railroad for a home layout, I would recommend the slightly longer (and easier to operate and build) version shown on the track plan page. Track Plan and Parts Lists for the home version Gateway Central XV.
Planning Photo of the Gateway Central XV HO Scale Switching Model Railroad
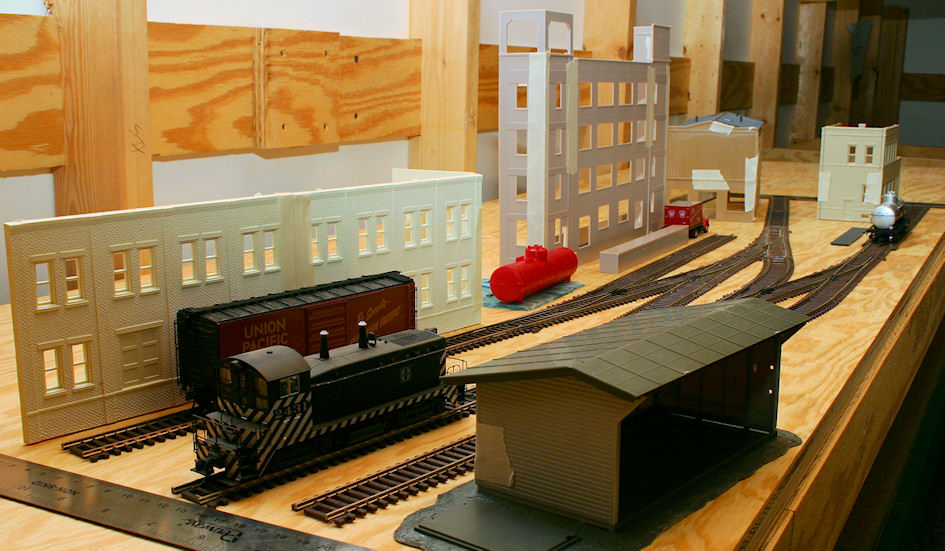
Although there are lots of good track planning programs available, I prefer to design small layouts using actual track pieces laid out at the final size of the railroad. This helps the planning considerably, since I have a tendency to pack as much railroad as possible into the space. I also like to mock-up the buildings using parts from the kit taped together to make sure they look appropriate and will fit in the space available (photocopies of the wall sections taped together would work as well). Buildings and Structures on the Gateway Central XV. The photos show the planning mock-up and the final Train Show layout.
Planning Photo of the Left Side of the Gateway Central XV HO Scale Switching Model Railroad
Left Side View of the Gateway Central XV HO Scale Switching Model Railroad
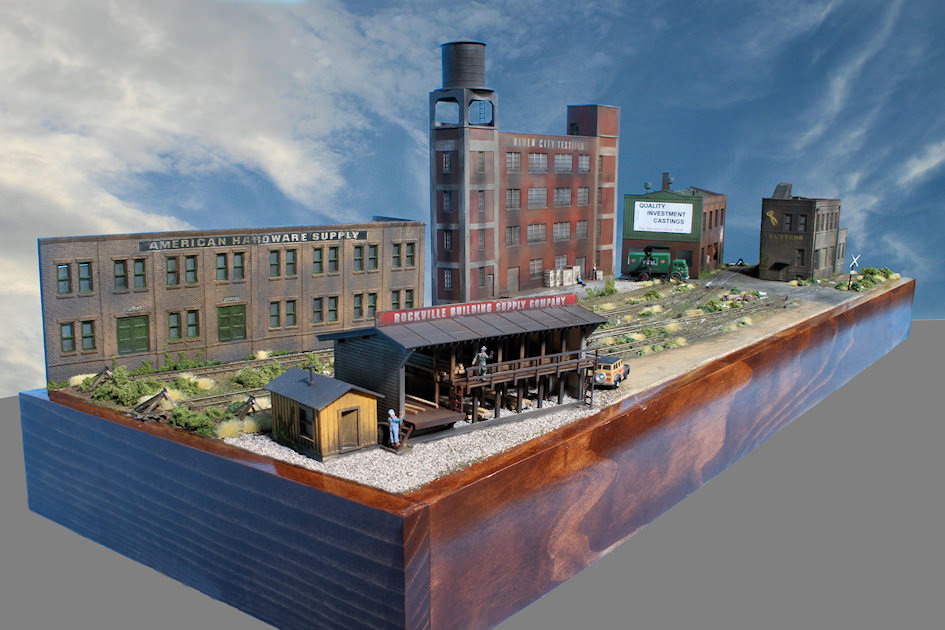
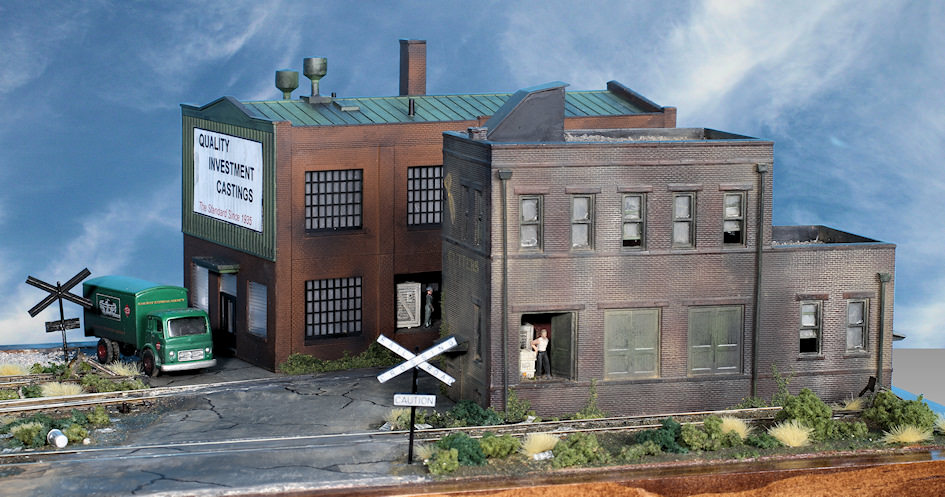
Small structures were selected for the front to not block the view of the tracks or the buildings in the back. The front structures were placed at the corners leaving the middle open to reach in to throw the turnouts and uncouple cars. The background structures line the rear edge of the layout, with the largest in the middle. The two back corners required kitbashed structures to suit the locations, but the structures selected are easy to customize this way.
Planning Photo of the Right Side of the Gateway Central XV HO Scale Switching Model Railroad
Right Side of the Gateway Central XV HO Scale Switching Model Railroad
The layout frame is constructed of select pine 1x4s – an outside box of vertical 1x4s with an inside shelf of horizontal 1x4s 2″ down from the top edge – all biscuit joined, glued and brad nailed (the nails just hold it together until the glue dried). This makes for an extremely rugged (almost indestructible) and lightweight frame. This is obviously overkill for a home layout, but great for a layout that travels around and is occasionally dropped. A piece of 2″ thick foam (available from your local building center – it’s used for insulation) was cut to fit inside the frame and was glued to the inside shelf with carpenter’s glue. The track was also attached with carpenter’s glue (just make sure not to put any under the moving parts of the turnouts). The frame, foam, track, and attached scenery weigh only 13 pounds.
Buildings on the Left Side of the Gateway Central XV HO Scale Switching Model Railroad
Buildings on the Right Side of the Gateway Central XV HO Scale Switching Model Railroad
This layout will go to Train Shows so that the public can run it – learn about operation, switch cars, see how it was built, and ask questions. We even plan on using it for switching contests – four cars on the layout is fairly easy, six or seven cars gets very interesting.
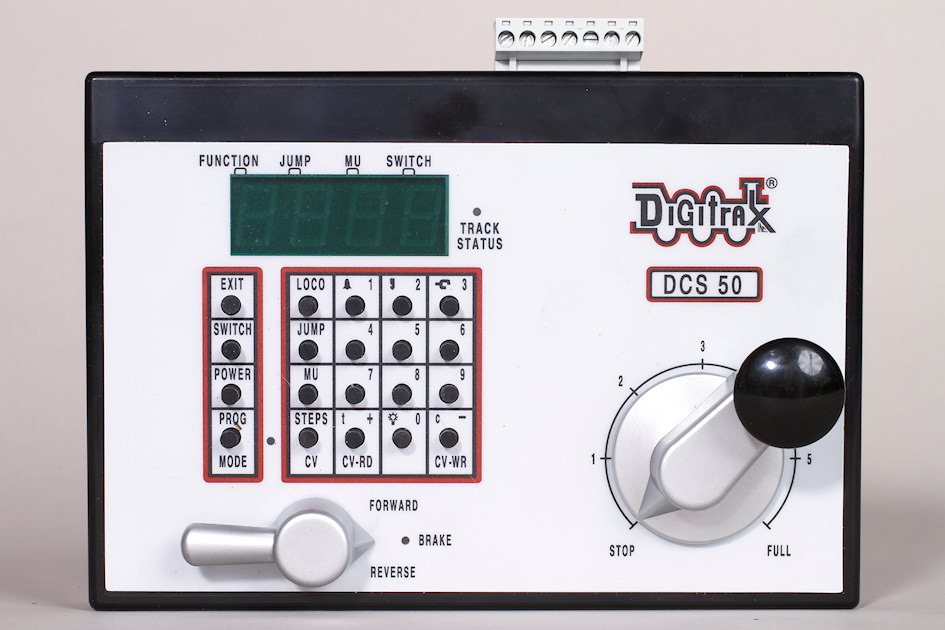
DCC control was selected for the layout as we can demonstrate how it works, and allows the public to learn and experience what DCC does hands-on. The engine has a SoundTraxx (sound) decoder installed so visitors can ring the bell and blow the whistle. An entry-level Digitrax Zephyr (DCS 50) throttle was selected which connects with two wires to the layout.
Look for this layout at our booth at upcoming Greater St. Louis Area train shows and our Annual St. Louis Train Show. Stop by, run a train, toot the whistle, and switch a few cars.
Gateway Central XV HO Scale Switching Model Railroad
Make sure to check out the close-up photos of each of the Buildings and Structures on the Gateway Central XV. That web page also includes information on how to kitbash the two back corner structures.
If you would like to build a railroad like this one, please see the Track Plan and Parts Lists for the home version Gateway Central XV.
source : http://www.gatewaynmra.org/2010/gateway-central-15-ho-scale-switching-model-railroad/
If you want to know more about Train model click here and Here
model train clubs

Kamis, 20 Agustus 2015

Save Space With These Deep Bookshelves


I’m a big fan of e-books. Making reading accessible in all kinds of places, and being able to house an entire library in a tablet or phone is a great use of technology. But my wife and I still have a lot of physical books, dating back to our very early years. I’ve built several bookshelves to house them. For one particular half-wall in our apartment, though, I wanted to display the books, as well as other objects we’ve collected in our lives and travels.
For this I designed a deep bookshelf that could function as a place for the books as well as giving extra shelf space for fragments of our history that don't lay flat.

Step 1 - Fill the Space, Get the Lumber

I measured out the half-wall next to the dining table and decided on a 6 foot length for the bookshelf. Because I wanted extra depth in the shelves, I went with 11 inches. There would be 4 columns and 5 rows, all with fixed shelves.
With my measurements in hand, I went to the local sheet goods supplier and bought a couple sheets of ¾-inch MDF and had them cut them down to manageable boards. Because everything was 11 inches deep, it made the breakdown of the boards easy.
I also picked up pine strips to edge the fronts of the columns, so they’d separate out and give the shelves a bit of a setback.

Step 2 - Cutting Down to Size

With all the lumber back in the shop, it was time to break everything down into their components. The easiest way to do this with reliable repetition was on the table saw with a home-made shooting board.
I chopped down piles of shelves, as well as the top and bottom pieces, along with sides and the column dividers. I also cut some smaller pieces that would be upright backs to some of the shelves, which would give me a way of anchoring the piece to a wall.
While I was doing this, I used some scrap to cut 2 very important rectangles from MDF. One side was 7 ½-inches, the other 10 inches. These were to be my measuring blocks for the shelf assembly.

Step 3 - Pocket Holes

My favorite joinery technique, especially when using sheet goods, is the pocket hole. But a little planning is necessary. I organized all my boards and marked with a pencil where all the pocket holes would go. That way, I knew I wouldn’t have pocket holes on the top and bottom sides of a shelf.
After everything was marked, I set up an assembly line and drilled pocket holes on all the components.

Step 4 - Assembly

With all the holes drilled, there was nothing left to do but put it all together. It was a big piece, and took some muscling. Long pipe clamps helped square up the basic shape while I put glue on the joined edges and brought it together with the pocket hole screws.
Once the rectangle was in place, I put in the column risers, again using wood glue and pocket hole screws.
The same method was used for the fixed shelves, and here’s where my reference blocks came in handy. Because the first 3 shelves down each column were spaced 7 ½-inches apart, I oriented the blocks so they measured that same distance. All I had to do was push the shelf up against the block, which automatically squared it, then attach it to the column sides.
Then I repeated the process, over and over again until the entire grid had been completed. When it was time to attach the shelves with a 10-inch distance, I simply flipped the reference blocks to that orientation. The half-backs were finally added to one row of shelves, giving the whole piece more structural integrity.
I had some long boards left over, so I ripped them down on the table saw and created a header and footer for the piece, which were attached with glue and brad nails.
I cut down the pine strips and faced the column edges with them, also attaching with glue and brad nails.

Step 5 - Paint

To keep things neutral so the books and objects on the shelves would be highlighted, I painted the shelf a clean white. It took a couple coats to get everything even, but it was soon glowing.

Step 6 - Haul It In and Mount It Up

Getting a piece this big into the apartment was a bit of a task, but with a couple people and a furniture dolly we managed to get it up against the half-wall. I put long wood screws through the back pieces and into studs, creating a strong and safe assembly.
Then we went to work filling up all the shelves. Books were organized into subjects. Objects collected thematically, or randomly, if they looked better that way. And while the shelf is rock solid, the display continues to be in flux. Things come and go as our collections change. And we always have a place to house our books, and the pieces that inspire us.
source : http://www.doityourself.com/stry/save-space-with-these-deep-bookshelves
If you want to know more about woodworking plans, just click here

American Sail, Builder of Quality Small Sailboats, Catamarans, and Daysailers


American Sail, Builder of Quality Small Sailboats, Catamarans, and Daysailers


If you're looking for small sailboats, daysailers or catamarans you have come to the right place. Our specialty for over thirty years has been making fun family sailboats from 8 to 18 feet. American Sail got its start in 1976 with the purchase of the Aqua Cat catamaran that has now been in production over 48 years and was recently inducted into the National Sailboat Hall of Fame. Over the years, we have grown to offer many more sailboats in our line including a larger version of the Aqua Cat, the Dink line of yacht dinghies, and four daysailers that are the Aqua Finn Daysailer, Pennant Daysailer, American 14.6 and 18 Daysailers.

All of our family sailboats are designed for fun and not hard-core racing. One person can rig each boat in the line in less than 20 minutes. Each catamaran and daysailer is also set up to be sailed by one person. We want you on the water enjoying our product and not spending lots of time at the boat landing trying to figure out how to step the mast or looking for a crew to sail.

Years of enjoyment await those who choose an American Sail sailboat. Our dedication to quality, service, and value has resulted in one of the best reputations in the sailing industry. We invite you to take a tour of American Sail's full product line of catamarans, daysailors, and dinghies. Small sailboats are our specialty!

For the most part, we are factory direct. If you have any questions regarding pricing or parts orders please do not hesitate to give us a call at 800-844-2399 or email us through our contact link on this page

source : http://www.americansail.com/ 

If you need more information about boat plans, Click Here

Rabu, 19 Agustus 2015

How to make Cabinet woodworking


Cabinet woodworking is kind of a fun activity that generates a terrific sense of satisfaction and fulfillment once your woodworking project is satisfactorily completed. You could quite easily swank your woodworking cabinet in your spouse, on your friends, for your colleagues, and then to throughout you. However, it could be very daunting and challenging if you don’t have simplified woodworking plans and basic woodworking tricks to hire a.Interestingly, good and easy-to-follow woodworking plans at the moment are available on the net where you can easily download them and be against your workbench very fast. In this case, it is vitally important for which you get these cabinet plans and tips when your close guide and not just be racking your mind attempting to generated a suitable woodworking plan the hard way.Okay, the subsequent are few advice to assist you get past the frustrations that many new woodworkers often have:Check Accuracy of Online Cabinet Woodworking PlansIn in so far as it’s simple to have your beginner woodworking project plan online, it’s the most vitally important that you look at the accuracy of them plans because there quite a few plans that have been either not accurate or just simply too complicated or too vague for new woodworker to easily follow and accomplish any of the custom woodworking plans outlined in it. It can be very discouraging hence you require guard against this beginners trap the moment you are able to. One fast way to achieve this would be to find out from friends you may have used that sources-how accurate or how easy it to the confident people to call on a plan. Online and offline friends inclusive.Sign up to Woodworking ForumsTherefore, to obtain your easy and accurate cabinet plans, you could possibly use Woodworking Forums in which you get practical recommendations from day-to-day woodworkers who could be more than prepared to assist you through. Moment you invest into he forums would really pay you back over and over as you’ll get to educate oneself about from the true experiences of many other people who may then help you shorten your learning curve. Forums might possibly be very rewarding for both the new comer and the old timers too. So, you stand an opportunity keep an eye on here too.Contact Your neighborhood Woodworking Or DIY ShopYou will also consult with your Local DIY Woodworking Shop who may also point you within the right direction but this really depends on your own locality and how knowledgeable a grage keeper can be. And except if you really trust him as a possible authority while in this, I would suggest you be mindful this particular option.Sign up to A Trade MagazineNext, you could Use a Woodworking Trade Magazine that might normally carry authentic info and attempts to address all categories of woodworkers- whether you desire to generate kitchen cabinet woodworking, a gun cabinet or anything custom woodworking cabinet. The exclusive concern here is that you’ll need to pay for your subscription which could encounter reasonably high amounts with time.Acquire Widely Attested Woodworking Guidance ResourcesLastly, which is is my favorite: you could experience an online, follow-my-step, new comer woodworking guides plans from an accomplished woodworker who understands the challenges of the beginner woodworker and can likewise provide just the essential steps to assist you to shorten your learning curve and commence your exciting woodworking activities. Getting the right guidance and attempts (early!) will make the distinction between succeeding or getting frustrated within your woodworking dreams.So it is recommend which you getting feet wet inside the right waters- get your plans originating from a reputable “grand-father” woodworker who understands the trade and is also prepared to plainly share the knowledge that you can make yourself a satisfied, learning-by-leaps, happy cabinet woodworker, every day, all the way up.
Woodworking plans are fun as well as a grea method of getting the family to come back together. Find great woodworking plans that one could truly enjoy and learn being a carpenter or being a hobby

source : http://www.koleksiartikel.com/cerita-cerita/furniture-woodworking-plans-and-complete-guides-to-woodworking.html